
Wrap Around Extension Ideas: Ultimate UK Design Guide for Homes
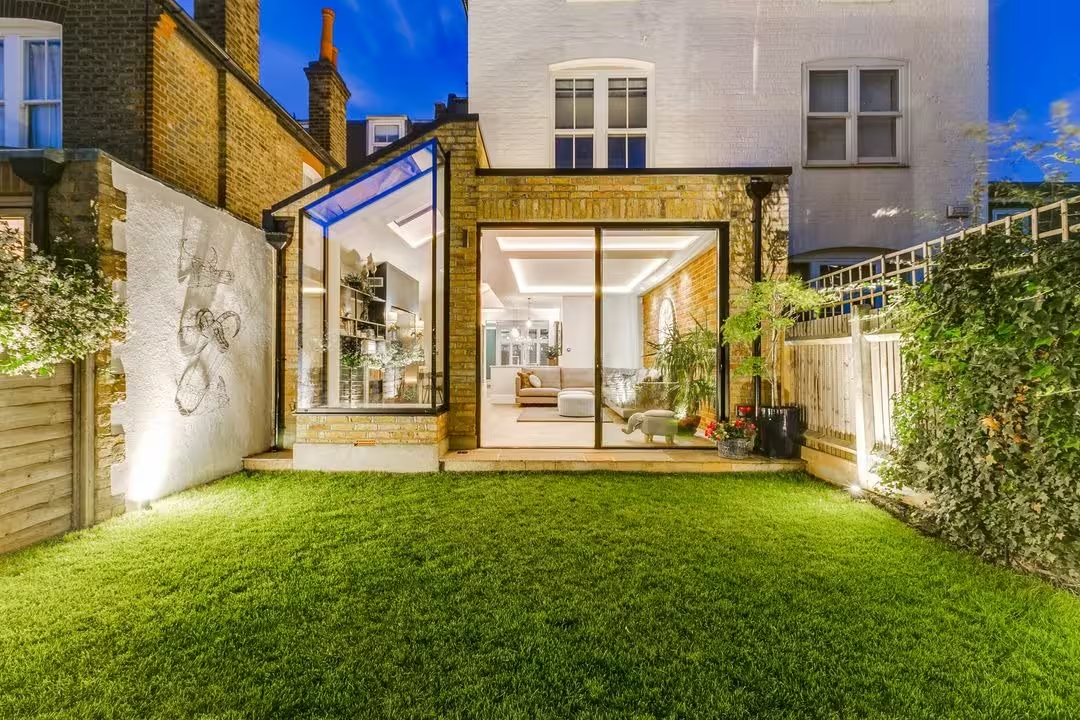
A wrap-around extension is one of the most transformative architectural investments a UK homeowner can make, blending a side return and a rear extension into a single, cohesive L-shaped footprint. By reclaiming the underutilised alleyway alongside your property and pushing out into the rear garden, you can completely remodel a cramped layout, create an expansive open-plan kitchen-diner, and flood dark middle rooms with natural light while adding substantial market value to your property.
For owners of Victorian, Edwardian, or semi-detached suburban homes, exploring creative wrap-around extension ideas represents the ultimate solution to the classic British problem of the long, narrow ground floor. Rather than moving house, extending sideways and rearwards simultaneously unlocks the spatial potential of your plot.
This comprehensive guide, curated by senior architects and content strategists, provides snippet-ready structural insights, planning frameworks, architectural design styles, and cost breakdowns to ensure your wrap-around project transitions from an ambitious concept to a stunning, high-performance reality.
Key Considerations for Seamless Structural Integration
A successful L-shaped extension must read as an intentional, harmonious evolution of your property rather than an awkward architectural afterthought. Achieving this requires meticulous structural surveying and material coordination.
Assessing Existing Structural Integrity
Before exploring creative wrap around extension ideas, you must evaluate the structural fabric of your original home. Because a wrap-around cuts across two distinct elevations, the side flank and the rear wall, it fundamentally alters how gravity and wind loads travel through the building.
- Foundations and Underpinning: Victorian and Edwardian terraced properties often feature shallow corbelled brick foundations. When excavating trenches for your new extension walls, your delivery team must assess whether your neighbour's footings require underpinning or if a specialist piled foundation configuration is needed.
- Load-Bearing Wall Removals: Unifying the new extension with the old kitchen requires removing massive sections of external load-bearing masonry. This demands the insertion of heavy structural steel beams, or Rolled Steel Joists (RSJs), resting on engineered concrete padstones or internal steel columns.
- Drainage Infrastructure Realignment: Most side returns house critical subterranean infrastructure, including shared foul sewers and surface water gullies. Rerouting these pipes requires careful planning, deep access chambers, and potentially a formal Build Over Agreement from your regional water utility company.
- Floor Level Alignment: To achieve a modern, step-free transition from the historic front rooms to the new open-plan rear, you must measure relative floor heights. This often requires lowering the floor slab of the extension or modifying original timber floor joists to establish an unbroken, flush finish.
Material Compatibility and Thermal Performance
To ensure a high-quality build, the exterior envelope must balance aesthetic cohesion with exceptional building physics.
- Brick and Mortar Matching: If your property sits in a conservation area, you must source reclaimed bricks that match the exact compression texture, colour variation, and dimensions of the original house. The mortar mix is equally vital; traditional lime-based mortars should be specified for period properties to allow the building to breathe, matching historic bonding patterns precisely.
- Eliminating Thermal Bridging: Wrapping a building creates complex structural junctions where new steel beams meet old solid brickwork. Without continuous external wall insulation or high-performance phenolic insulation boards, these junctions become cold bridges, leading to localised condensation and structural dampness.
- Specification Accountability: Keep a physical sample box on-site containing approved brick slips, render swatches, transition trims, and window frame samples. This ensures that your chosen house extension builders in London or your local contractors do not introduce substandard material substitutions during the second fix.
Achieving Aesthetic and Streetscape Consistency
When an extension wraps around the side flank, it often becomes visible from the public highway. Architects must align new fascia lines, eaves detailing, and roof tile profiles with the existing building's rhythm to secure local authority approval. For period homes, you can echo the historic architecture by specifying recessed window reveals and traditional sash proportions, whereas modern structures benefit from sharp geometry and minimal material palettes.
Architectural Design Approaches for L-Shaped Layouts
The spatial geometry of a wrap-around footprint lends itself to several distinct layout configurations, depending on your family's daily lifestyle requirements and long-term space planning goals.
Open-Plan Extensions
The most sought-after layout within modern architectural design is a vast, continuous open-plan living zone. By knocking out internal partitions, the L-shaped space naturally maps out dedicated zones for cooking, dining, and casual lounging without the need for physical doors.
When designing an open-plan kitchen within an L-shaped layout, position your primary service wall, housing heavy appliances, extraction systems, and plumbing runs, along the solid boundary flank. This keeps the rest of the floor area flexible for freestanding furniture and positions your main dining zone directly adjacent to full-height glazed sliding doors, framing clear views of your garden landscape. Key design moves include:
- Orienting your primary family seating areas toward garden vistas and natural daylight.
- Positioning the formal dining area directly between the kitchen and external access paths for optimal traffic flow.
- Using consistent flooring materials and uniform ceiling treatments to read the extension as one continuous volume.
Zoned and Broken-Plan Layouts
For large families, completely open spaces can sometimes feel noisy and chaotic. A "broken-plan" approach remedies this by using subtle architectural interventions to divide the L-shaped footprint into distinct, purposeful zones.
- Glazed Industrial Partitions: Installing Crittall-style glass screens allows you to isolate a quiet home office or children's playroom within the side return while preserving sightlines and light transmission from the main kitchen-diner.
- Low-Level Joinery: utilising bespoke double-sided cabinetry or half-height storage walls creates a clear psychological separation between a formal reception room and a busy family zone.
- Dual Entrance Routing: Designing two separate doorways from the original hallway allows guests to be guided through a formal reception path while family traffic moves directly into the everyday mudroom or utility core.
- Service Concentration: Locating smaller bathrooms and high-utility laundry rooms on the inner corner of the L-shape keeps service networks highly efficient and contained.
Multi-Storey Wrap-Around Solutions
If your plot is tight but you require additional bedrooms or a master suite, expanding vertically with a two-storey wrap-around is highly cost-effective. By utilising the same foundation footprint and ground-floor roof structure, you gain double the living volume.
However, multi-storey variants demand structural depth analysis, as adding a second floor increases the load on party walls. It also requires careful coordination of the internal staircase layout to prevent losing valuable square footage in your existing first-floor bedrooms. To make it work, always design your party-wall insulation and soundproofing schemes from the absolute start of the design phase.
Maximising Natural Light and Advanced Glazing Systems
Because wrap-around extensions create exceptionally deep floor plans, daylighting becomes the defining element of the architectural design. Without strategic glazing, the central core of your original house risks becoming dark and uninviting.
Panoramic Windows and Structural Glass Walls
Specifying full-height, expansive panoramic window frames along your rear garden elevation is a brilliant way to capture low-angle winter sunlight. When reviewing window configurations, prioritise thermally broken aluminium or timber-aluminium composite frames. These frames offer the high structural strength needed to support massive double- or triple-glazed units while keeping sightlines to an absolute minimum.
To comply with Building Regulations Part L, ensure your glazing packages achieve a total U-value of 1.2 W/m²K or lower, preventing excessive winter heat loss. For privacy and solar control, combine external adjustable louvres or motorised blinds with low-e coatings and solar-control glass. If security is a major concern on urban streets, specify laminated safety glass and multi-point locking systems rather than reducing your chosen glazing area.
Skylights, Roof Lanterns, and Linear Glazed Links
To channel daylight deep into the old part of the house where side windows cannot reach, you must utilise the extension's roofscape.
- Linear Glazed Links: Installing a continuous strip of frameless structural glass along the boundary wall where the side return meets the original brickwork creates a striking architectural feature. It flushes the old external wall with overhead daylight throughout the day.
- Roof Lanterns: For flat-roofed extensions, a raised aluminum roof lantern adds significant vertical volume and introduces changing sky views. Ensure all roof glazing features warm-edge spacer bars and self-cleaning, low-emissivity coatings to simplify ongoing maintenance.
- Solar Gain Management: Large expanses of horizontal glass can cause an extension to overheat during summer. To mitigate solar gain without installing bulky internal curtains, integrate automated external louvres or select electrochromic smart glass that tints dynamically in response to sunlight intensity.
Creative Uses for Extended Spaces
The generous, flowing geometry of an L-shaped wrap-around extension provides the perfect canvas for tailoring bespoke rooms that enhance both daily liveability and property value.
Contemporary Social and Entertaining Hubs
A well-zoned wrap-around extension can host multiple social activities simultaneously without feeling crowded. Position your main kitchen island as the central anchor of the space. We recommend specifying a deep island measuring 1.2 to 1.5 metres; this allows you to locate induction hobs or prep sinks on one side while providing comfortable breakfast bar seating on the other, letting the cook interact freely with guests.
To soften acoustics in open-plan spaces with expansive glazing and hard floors, introduce sound-absorbing elements early in your space planning process. This can include acoustic plasterboard ceilings, fabric wall panels, or heavy floor rugs. Complete the zone by layering your lighting: deploy architectural pendants for task lighting over the island, low-glare downlights for general illumination, and dimmable LED tracks around seating areas to shift the mood from day to night.
Flexible Home Office and Studio Solutions
With remote working remaining a permanent fixture of professional life, carving out a dedicated workspace within your extension is highly practical. The narrow side-return arm of a wrap-around is an ideal location for a compact home office, providing a quiet zone that feels separated from the main living area.
- Ergonomic Dimensions: Specify a custom desk depth of 700 to 800 mm to ensure comfortable screen distances, and integrate hidden under-desk cable management trays to eliminate visual clutter.
- Adaptive Privacy: Install a sliding timber pocket door or an acoustic curtain system, allowing the workspace to be completely hidden from view when the working day concludes.
- Dedicated Infrastructure: Wire the home office zone with a dedicated radial electrical circuit and multiple Cat6 data points to prevent connectivity drops during critical video conferences.
Architectural Reading Nooks and Daybeds
Transform the corner where your extension wraps around into an atmospheric reading nook or a built-in daybed. Crafting a timber bench measuring 450 to 500 mm deep with integrated pull-out storage drawers underneath maximises every square inch of the footprint. By matching this seating with a low-silled picture window, you create a peaceful sanctuary that frames garden views, making it the perfect spot to enjoy a morning coffee.
Exterior Enhancements: Connecting Indoors to Out
An outstanding wrap-around extension should not stop at the external walls; it should extend its design vocabulary into your garden landscaping to create a seamless indoor-outdoor transition.
Landscaped Terraces and Sunken Patios
To visually amplify the scale of your new extension, design an adjacent terrace that matches the structural lines of your L-shaped footprint. utilising matching non-slip porcelain tiles or seamless poured concrete both inside and out blurs the boundary line, tricking the eye into perceiving the internal space as twice its actual size.
Ensure your external levels are correctly engineered: specify a low-profile drainage channel immediately in front of your doors and slope the external terrace away from the building by a minimum 1:100 gradient to prevent surface water pooling during heavy downpours. Incorporate built-in seating and storage along the return wall to maximise space without clutter, and position raised planters to frame the terrace, screen neighbours, and create microclimates for herbs or pollinators.
Designing the Perfect Architectural Overhang
Integrating a dramatic structural roof overhang or an external timber canopy protects the flush threshold from wind-driven rain, allowing you to leave your bi-fold doors wide open even during light summer showers. Consider cross-ventilation by placing additional operable windows on the return wall opposite the main opening to keep the air fresh.
Sustainable Architecture and Thermal Efficiency
As energy costs remain a key consideration for homeowners, integrating high-performance eco-friendly features into your wrap around extension ideas ensures your new space is cost-effective to run and environmentally responsible.
Low-Carbon Building Fabric and Breathable Materials
When designing a sustainable architecture for a London home or a regional property, the choices you make about building materials significantly impact its long-term carbon footprint.
- Engineered Timber Frames: Specifying Cross-Laminated Timber (CLT) or glulam beams offers an exceptional strength-to-weight ratio, allowing you to reduce the amount of structural steel required while locking away embodied carbon.
- Breathable Insulation: utilising natural wood fibre, hemp, or sheep's wool insulation within timber cassettes regulates indoor humidity naturally and prevents interstitial condensation across solid party walls.
- Eco-Conscious Concrete: For your foundation and floor slab design, specify geopolymer concrete mixes or concrete with a high percentage of fly-ash substitution to reduce the carbon footprint of your build from the ground up.
- Surface Compliance: Prioritise finished surfaces that avoid PVC and contain low volatile organic compounds (VOCs). Natural clay paints, FSC-certified joinery, and recycled insulation help support excellent indoor air quality over decades of intensive family use.
Advanced Insulation and Mechanical Ventilation (MVHR)
To achieve a comfortable, stable climate year-round, your new extension must maintain excellent airtightness. We target an airtightness score of 3.0 m³/m²·hr or better at 50 Pa, achieved by using continuous air-sealing tapes across all structural junctions.
Because an airtight space requires managed airflow to prevent stale air and moisture build-up, you should integrate a Mechanical Ventilation with Heat Recovery (MVHR) system. These systems continuously extract warm, humid air from your kitchen, extract up to 90% of its thermal energy via a heat exchanger, and use it to pre-warm fresh, incoming filtered air delivered directly to your living zones without creating cold draughts.
Renewable Energy Integration
A flat or shallow-pitched wrap-around roof is the ideal platform for a 2 to 4 kWp solar photovoltaic (PV) array. Orienting these panels south or west allows you to generate clean electricity to power energy-intensive kitchen appliances and modern air-source heat pumps. To maximise your self-consumption, pair the solar panels with a smart hybrid inverter and a 5 to 10 kWh battery storage pack, allowing you to store cheap solar energy generated during the day for use during peak evening hours.
When introducing an air-source heat pump, always size the unit from a detailed, room-by-room heat loss calculation rather than a generic rule-of-thumb. Where planning restricts visible external equipment, place the heat pump condenser units discreetly with acoustic screening to meet strict local authority neighbourly noise limits.
Regulatory Essentials and Project Management
Navigating the statutory permissions required for an L-shaped wrap-around extension can be complex, as these builds affect multiple boundaries simultaneously.
Do I Need Planning Permission for a Wrap-Around Extension?
A common question homeowners ask is, "do I need planning permission for an extension?". While simple side returns or single rear extensions can sometimes be built under Permitted Development (PD) rights, a wrap-around extension almost always requires full planning permission. This is because planning departments treat the side and rear components as a single cumulative development, which breaches standard PD width and boundary rules.
If you are extending a terraced or semi-detached home, you must submit a formal planning application to your Local Planning Authority (LPA). We advise preparing scaled drawings and a brief design statement before submission. These documents speed up pre-application advice and help identify potential issues such as impact on neighbours, conservation areas, or listed-building constraints.
Statutory Documentation and Timeline Requirements
You must comply with building regulations irrespective of planning status. Structural, damp proofing, insulation, and fire-safety requirements commonly apply; engaging a structural engineer and qualified builder early saves time and cost.
- The Planning Process: A formal planning application requires detailed architectural drawings, a Design and Access Statement, and local context mapping. Expect the LPA to take 8 to 12 weeks to issue a formal decision.
- Party Wall Notices: Because a wrap-around extension builds up to or adjacent to shared boundaries, you must comply fully with the Party Wall etc. Act 1996. You are legally required to serve formal Party Wall notices to your neighbours at least two months before commencing structural works. To learn more about managing this process smoothly, see our dedicated party wall surveying services.
- The Role of Professionals: To avoid costly delays and ensure compliance across all stages, understanding the difference between a structural engineer vs architect is vital. Your architect manages layout design, spatial flow, and the planning process, while a structural engineer calculates steel sizing and foundation depths to satisfy building control inspectors.
Financial Budgeting and Trade Management
An architectural project requires a transparent, itemised financial strategy from day one to keep costs on track.
Project Phasing and Cost Control
We start with a realistic budget that includes build costs, professional fees, and a contingency of at least 10% to 15%. Unexpected groundworks or party-wall issues are common with wrap-around extensions, so the contingency protects the schedule and your finances. We break the project into logical stages: design and surveys, planning and approvals, construction, and finishing. Each stage gets a cost estimate and milestone dates so you can track progress and cashflow easily.
We recommend getting three detailed quotes from reputable builders and validating them against a simple cost-per-square-metre benchmark. Use a comparison matrix to track structural work, groundworks, internal finishes, and professional fees across Quote A, Quote B, and Quote C to spot omissions quickly. Appoint a single project lead, either an architect, project manager, or a trusted builder, to coordinate trades and approvals. Clear lines of responsibility reduce delays and cost creep.
Comprehensive Change-Order Management
Monitor progress weekly and update your budget spreadsheet after each invoice. Small, regular checks catch scope changes early and keep decisions evidence-based. Document all change orders strictly in writing and assess their cost and time impact before approving. That discipline avoids disputes and helps keep the project within the agreed budget and timescale.
Maintenance and Long-Term Durability
Prioritise durable materials and detailing to reduce long-term upkeep. Choosing well-insulated walls, quality glazing, and robust roofing cuts energy loss and limits future repair needs.
Seasonal Upkeep Protocols
Regular inspections catch small issues before they grow. Check roof junctions, flashing at the wraparound corner, and seals around windows every 6 to 12 months to prevent water ingress. Follow this simple seasonal checklist:
- Inspect external joints and render for hairline cracks or water pathways.
- Clear gutters, rainwater hoppers, and downpipes, especially where the new extension roof meets the original building fabric.
- Lubricate all moving kinetic tracks, hinge mechanisms, and multi-point locks on external doors and windows.
Managing Structural Settlement
Pay close attention to thermal and physical movement where new and old structures meet. Differential settlement and thermal expansion can stress physical joints; flexible sealants and dedicated movement joints mitigate this risk over time.
Consider finishes and maintenance frequency when specifying materials. Hard-wearing cladding and powder-coated aluminium frames need less frequent painting than timber, but timber can be oiled and repaired easily if you want a natural look. Finally, build in access for maintenance where possible. Rooflights, high-level glazing, and flat roofs should have safe access routes or designated service zones to avoid ad-hoc scaffolding costs. Keep a detailed maintenance log to help you spot patterns and plan future home maintenance budgets effectively.
FAQs about Wrap Around Extension Ideas
Is a wrap-around extension more expensive than a standard rear addition?
Yes, on a cost-per-square-metre basis, a wrap-around is generally more expensive than a standard single-storey rear extension. This is due to its increased structural complexity, which requires complex structural steels where the side and rear openings meet, extensive foundation works alongside shared boundaries, and intricate roof flashing junctions.
How long does a typical wrap-around extension take to build?
A standard single-storey wrap-around extension typically takes 12 to 20 weeks on site for structural construction and core envelope works, with an additional 4 to 8 weeks needed for final interior fit-out, kitchen installation, and decorating. The pre-construction planning, engineering, and party wall award phases usually require an additional 4 to 6 months before your builders can break ground. To understand how these milestones fit together, read our detailed guide on the construction phases of house developments.
Can I build a wrap-around extension if I have a shared public sewer line?
Yes, but you will need to apply for a formal Build Over Agreement from your regional water utility company before beginning any foundation work. Your structural engineer will need to design concrete bridging lintels or specify a mini-piling configuration to ensure the weight of the new extension does not put pressure on the underlying pipework.
How can I stop the central rooms of my house from turning dark?
Integrating a continuous strip of frameless structural glass along the original boundary wall, inserting large roof lanterns, and using open-plan layouts are excellent ways to bring natural light into the deep core of your property. For more expert tips on illuminating your extension beautifully, check out our guide on the best lighting tips for architecture.
Do I really need an architect, or can a builder handle the project design?
While some builders offer basic design-and-build services, a wrap-around extension's structural and planning complexities mean hiring a specialist is highly beneficial. An architect ensures your layout maximises usability, navigates local planning restrictions smoothly, and produces high-precision drawings that keep building quotes accurate. If you are weighing up your options, read our advice on "do I need an architect for an extension?".
How much value will an L-shaped extension add to my home?
The exact capital appreciation depends heavily on your property's location and local market demand. However, a well-executed wrap-around extension that resolves a property's layout flaws can increase your home's value by 15% to 25%, making it an excellent long-term financial investment in premium urban areas.
Transform Your Property with dRAW Architecture
Ready to unlock the true potential of your home? At Draw Architecture, we blend creative vision with technical expertise to design stunning, sustainable spaces tailored to your lifestyle. Explore our innovative architectural design for small house strategies, or take a look at our professional contemporary interior design ideas to discover how we can transform your layout.
Discover how our architectural design and exterior design experts can help you by visiting our homepage. Alternatively, you can contact our expert design team today to schedule your initial site consultation. Let's design something extraordinary together.